

HyruleBalverineStaffPremium
Guides
-

HyruleBalverine posted a guide for ACR | Impress Warren Vidic.
If, like me, you went a little nuts trying to memorize the way through without accidentally getting hit and would like an easier way of doing this than "Geting good" here's a video that shows you how to glitch through the map and get this extremely easily: -

HyruleBalverine posted a guide for Impress Warren Vidic.
If you'd like an easier way of doing this than "Get good" here's a video that shows you how to glitch through the map and get this extremely easily: -

HyruleBalverine posted a guide for Such a dangerous place.
This is super simple and you'll likely get it shortly after starting the game. Just find a room with enemies or traps and die. Note that this achievement does not unlock if you die in the final battle against the boss; it must be before that happens. -

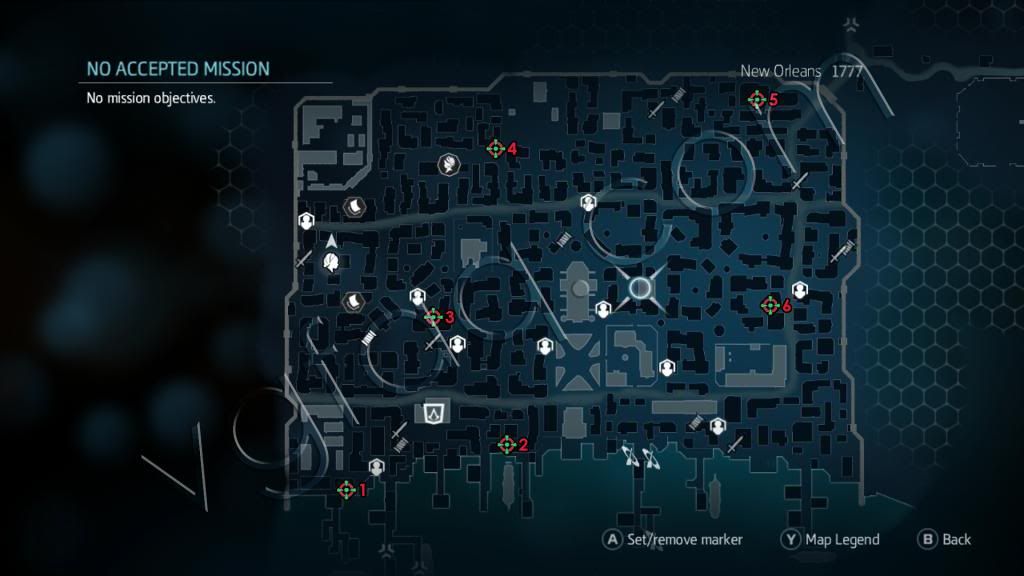
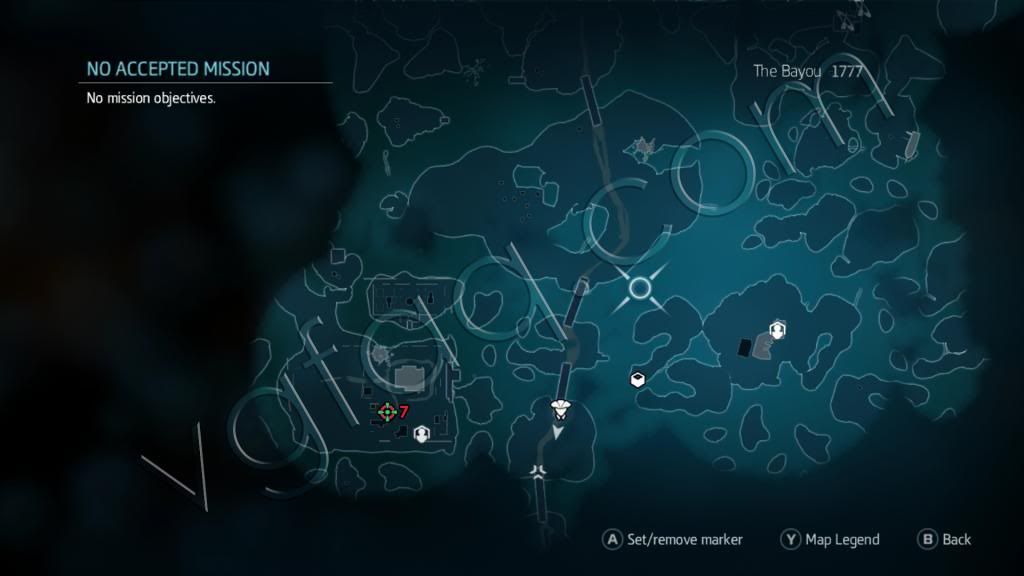
HyruleBalverine posted a guide for ACL | Business Woman.
I found these maps online (at http://www.vgfaq.com/assassins-creed...issions-guide/), which should help in locating the missions; of course they will show up on your map, too. Note that while two of them in New Orleans and the one in the Bayou will show up earlier, the bulk of these will not appear until after Sequence 5 Memory 2 is complete. You do not need to complete the optional constraints for the achievement, but you obviously do if you want to 100% complete the game just because you feel like it.
-

HyruleBalverine posted a guide for Such a dangerous place.
Super simple and it's likely you'll get it shortly after starting the game. Just find a room with enemies or traps and die. Note that this achievement does not unlock if you die in the final battle against the boss; it must be before that happens. -

HyruleBalverine posted a guide for Who am I?.
Pretty much story related. You get this for starting the game with the only character you can play with when you first load up the game. -
HyruleBalverine posted a guide for Almost but not quite.
Pretty simple; once you get down to 1 point of life (the heart) use a food card to heal. -
HyruleBalverine posted a guide for This noise attracted more walkers!.
You can deactivate an alarm by using the "Tool" card, assuming you picked one up before setting of the alarm, and then selecting the alarm. It does not appear that you can attack/use a weapon against an alarm. -
HyruleBalverine posted a guide for Kill a walker with a single blow.
Some of the cards you can pick up are weapon cards. The number in the top left corner is the amount of damage the weapon does. The number in the bottom right corner is the amount of times you can use it. Make sure that the amount of damage dealt is greater than or equal to the amount of health on the walker's card (top left with a heart icon) -

HyruleBalverine posted a guide for Multi-kill with a grenade.
Just throw a grenade into groups for multikills. I find that Brian's Molotov cocktails work well for this as they continue to burn after being thrown. If you don't get this playing through the story, you should be able to get it easily in Multiverse Madness. -
HyruleBalverine posted a guide for One Shot Kills.
You can easily get both One Shot Kills and Head Shot with a sniper rifle. You first get the sniper rifle at the start of "Something's Amish!". You can also get One Shot Kills by shooting one of the propane tanks in "It's All Greek to Me" that sit right next to enemies. -
HyruleBalverine posted a guide for Head Shot.
You first get the sniper rifle at the start of "Something's Amish!" (Level 1). You should be easily able to get a head shot with it. You'll also get "One Shot Kills" if you haven't already. -
HyruleBalverine posted a guide for There is no Cake.
Not so much as guide to how to get this but more to prevent the glitch that keeps this from unlocking. Make sure that you get save at least one item from the store until you have every other achievement. The last achievement you get before this should be Mort Will Now Lend You Credit. -

HyruleBalverine posted a guide for Doll Fancier.
If you've been following my guides, you should have "Strike Breaker", "Seasoned Swashbuckler", and "Ship Solver". Keep following in order to get the rest of the dolls on the Gilded Steam Ship:
If you haven’t already done so, get two more dolls made over at the Artist Makeover shop. Across from the Artist Makeover shop is a place called Previously Dropped Anchors. Stack into the doll inside of that shop.
Collection: Dropped Anchor Drew (27)
Use his “Drop Anchor” ability on 5 female dolls. There should be plenty in The Commander’s Buffet.
Hi-Jinks: Anchor of Love – Drop Anchor near female dolls (5)
Head back to where you started on the starboard bow and stack into the Grand Adventurers, up to Hunter Darby. While here, stack into your final doll, the ship’s captain.
Collection: Captain Swing (22) -
HyruleBalverine posted a guide for Maritime Merriment.
If you've been following my guides, you should have "Strike Breaker", "Seasoned Swashbuckler", "Ship Solver", and "Doll Fancier". Keep following in order to complete the Hi-Jinks:
Stack out of Captain Swing, because it’s time to go hunting. Take Hunter Darby up to the white coated dolls and use his “Fire Cork” ability to shoot them. The Stewards include dolls wearing the lion masks.
Hi-Jinks: Steward Season – Hit stewards with the cork gun (10)
Once you complete this, stack down to Professor Ramses and continue to “Mummify” victims until you have completed the Steward Season Hi-Jinks challenge, if you weren't able to earlier. -
HyruleBalverine posted a guide for Ship Solver.
After completing the Gilded Steam Ship Adventure a popup appears and tells you that you can stay aboard the Gilded Steam Ship or return to the Royal Train Station to continue the adventure. Choose to stay and complete the area. Once you start up, another popup appears, this time explaining Bonus Challenges. Follow the objective marker aft to The Buried Treasure club, where a brief cutscene tells you that the club is now open, and you can begin the “Get the Gits a Gig” Challenge.
Assuming you used my guide to complete that level, start following from here to reach the next achievement.
First, stack into one of the two hillbilly-looking dolls standing just outside of the club. It doesn't matter which one.
Collection: Bobby Webb (25)
Collection: Billy Webb (26)
Then stack into any fancy looking doll and enter the club. The other Webb boy will follow you in. Once inside, stack out of the fancy doll and go up onto the stage.
Challenge: Get the Gits a Gig (1/3) – Fancy Facade
Stack into a Webb boy again and return to the Artistic Makeover shop. Get each of the Webb boys a makeover. You should now have at least 3 of the 5 makeovers required for the “Masquerade Ball” Hi-Jinks challenge. Now simply go into The Buried Treasure club and climb onstage.
Challenge: Get the Gits a Gig (2/3) – Painted Black and White
Stack into Hand and “Toss Cookies” next to the Pirate, causing his parrot to move off of his shoulder. Now stack into one of the Webb boys and then into the Pirate.
Collection: Pirate Chuck (21)
Take a moment to use Pirate Chuck’s “YAR!” ability on dolls to make them faint.
Hi-Jinks: Broadsides! – Use Pirate Chuck to make dolls faint (5)
Once you have done that, go to the door to The Buried Treasure club and “YAR!” the bouncer at the door. Note that this does not seem to count for the “Broadsides!” Hi-Jinks challenge, which is why we did that first. Once inside of the club stack out of Pirate Chuck and go onstage one last time.
Challenge: Get the Gits a Gig (3/3) – Polly Got a Cracker -
HyruleBalverine posted a guide for Seasoned Swashbuckler.
After completing the first visit to the Royal Train station, you'll get a cutscene. When the cutscene ends walk toward the people to begin a new cutscene where a carrier pigeon brings you a message from Levi and you receive an explanation about the Secret Hideout. Once that has completed, follow the objective marker back to the train station and speak to Conductor Orville to take the train to the next area, the Gilded Steam Ship.
Gilded Steam Ship
OK you land-lubbers, this is a ship, so I will be using some basic nautical terms. The front of the ship is the bow, the left is port, the back is the stern, and the right is starboard. Moving forward is towards the front/bow, and moving aft is towards the back/stern.
The opening cutscene tells you that the children are being put into forced labor on the ship, and in order to rescue your sister, Agatha, you must rescue the children by stopping the cruise. In order to do this, you must get four very special cruise guests upset enough to confront the ship’s captain. The level begins with you at the starboard bow. Follow the objective marker to the bow of the ship where the Seaside Safari is located. On your way to this first objective, a tutorial screen pops up to introduce Hi-Jinks. Your task here is to “Cause Chaos at the Safari” and makes Safety Inspector Ludd stop the safari, which makes Hunter Darby complain to the captain. Your first challenge requires you to stack into the doll sitting in the cannon.
Collection: Field Commander Appleyard (24)
Then, turn the cannon to the left and fire into the steam pipe.
Challenge: Cause Chaos at the Safari (1/4) – Misfire
Next, stack into one of the large dolls with a boxing glove (there is one on either side of the Seaside Safari, standing in front of a paper lion). This pops up a tutorial screen informing you of a newly available doll size. Use this dolls ability to give a “Proper Uppercut” to each of the three paper lions, breaking them and stopping the Safari.
Challenge: Cause Chaos at the Safari (2/4) – Wild Animauler
Next, go up to the 2nd deck and aft towards the stern where a shark jawbone sits on the railing. There you should find a dog in an argyle sweater. Stack into this dog.
Collection: Illusion Family Set: Prestige (8)
Take Prestige and stack into a pelican (there will likely be one near you once you stack into Prestige, if not there will be one near where you started on the starboard side of the ship). Next, return to the Safari while still in the pelican and fly to the nest in the window at the Starboard Bow side of the ship, just behind the Safari.
Hi-Jinks: Nesting Instincts – Use pelicans to fly to all nests (1 of 4)
Note that the other three nests are located: On the port quarter railing of the 2nd deck near the shark jawbone; on the starboard quarter railing of the 3rd deck above The Commander’s Buffet; and on the 2nd deck in The Commander’s Buffet.
From the nest, go into the room and stack into the bear that is inside.
Collection: Kodiak Bear (1)
Hi-Jinks: Animal Stack – Stack Prestige, any pelican, and the Kodiak bear together
Take the bear back to the Seaside Safari and “Growl” at the guests there.
Challenge: Cause Chaos at the Safari (3/4) – Un-Bear-Able
For the final solution to this challenge, stack into a doll with the “Make Way” ability, and use it on the dolls tied to the paper zebra to cause them to move over onto the yellow line. Then stack into the cyclists on the bicycle built for four and “Pedal Bike” into the paper zebra.
Challenge: Cause Chaos at the Safari (4/4) – Penny Lane
Before moving on, briefly stack into the doll wearing the orange safety vest to add him to your collection.
Collection: Safety Inspector Ludd (23)
Now, look for a small doll wearing green. He can usually be found on the first deck running around the forward section. Stack into him and use his ability to “Toot” on other dolls for your next Hi-Jinks challenge.
Hi-Jinks: Lil’ Stinky – Toot on dolls (5)
Next, follow the objective marker to The Argyle Ballroom on the port side of the ship. Your task is to disrupt and close down the exhibit being held there, thus sending Professor Ramses to complain to the captain. For the first solution, stack into the security guard standing next to the mummy.
Collection: Exhibit Guard Walter (14)
Use his ability to “Escort Small Doll” and move the children out of the way so that you can stack into the mummy.
Collection: Mummy (4)
Once in the mummy, simply leave the exhibit.
Challenge: Sabotage the Exhibit (1/5) – Mummy Dearest
For the second solution, stack into a boxing doll again (there should be one just outside of The Argyle Ballroom, next to the railing) and give a “Proper Uppercut” to the sarcophagus that is wearing boxing gloves (The Fighting Pharaoh).
Challenge: Sabotage the Exhibit (2/5) – Fighting Pharaoh
Remember Prestige the dog? Good; go stack into him. Take him to the Artist Makeover shop inside the forward section of the 2nd deck (just forward of The Commander’s Buffet). Just outside the door to the Artist Makeover shop is a female doll in the same argyle sweater; stack into her.
Collection: Illusion Family Set: Gwendola (7)
Take Gwendola to the guest quarters immediately below you on the 1st deck. Stack into the doll that looks like a Gypsy/Romani.
Collection: Illusion Family Set: Peatrice (6)
Next, stack Peatrice into the magician standing at the entrance to The Argyle Ballroom.
Collection: Illusion Family Set: Ronaldo (5)
After the cutscene, stack back into Ronaldo and use his ability to “Perform Illusion” on the large sarcophagus next to the plaid wall, hiding it.
Challenge: Sabotage the Exhibit (3/5) – Queen of Argyle
Hi-Jinks: A Mass Effect – Perform the Argyle Illusion on dolls (1 of 12)
Note, depending on how close you are to other dolls, the number you have done may vary.
For the fourth solution, go stack into the sarcophagus next to the stage in The Argyle Ballroom.
Collection: Gilded Sarcophagus (15)
Use the “Shine” ability to attract a larger doll to you and stack into it. Again, simply leave The Argyle Ballroom.
Challenge: Sabotage the Exhibit (4/5) – Relic Rustler
Now, stack into a violinist and return to the starboard side of the ship, just aft of where you started. You should see a doll standing on a chair. Use the “Play Violin” ability next to him to get him down and stack into him.
Collection: Pied Piper (2)
Use his ability to “Play Flute” near the mice at the stern of the ship (near The Buried Treasure club) and lure the mice into The Argyle Ballroom and to the cheese sphinx.
Challenge: Sabotage the Exhibit (5/5) – Curd of the Ancients
Before moving on, stack into the little doll that kept shutting the exhibit down.
Collection: Ferdinand Reginald (13)
To get to the next challenge, follow the objective marker up the stairs on the starboard quarter, up to The Commander’s Buffet. The cutscene will explain that you need to stop the caviar service, causing Madame Habitant to complain to the captain. After the cutscene, stack into the doll that is wearing a chef’s jacket and carrying a spoon and sack.
Collection: Gruel Chef Hornsby (10)
Take him into the kitchen through the small cutout doorway and “Poor Gruel Thickener” into the rolling caviar holder (it looks like a fish with wheels and a hat).
Challenge: Stop the Caviar Service (1/5) – Caviar Porridge
Stack into Gruel Chef Hornsby again. This time, “Poor Gruel Thickener” into the water that is moving the little caviar boats between the kitchen and dining area.
Challenge: Stop the Caviar Service (2/5) – Seas of Gruel
Stack into a large doll and head aft to the large shark jawbone. Enter the kitchen via the double doors located there, and use the large doll to push the caviar out the doors and to the shark jawbone.
Challenge: Stop the Caviar Service (3/5) – Eggs Overboard
Stack into the Pied Piper and return to the large doors to the kitchen. Next to them are three mice; use the Pied Piper’s “Play Flute” ability to lure the mice into the kitchen through the double doors.
Challenge: Stop the Caviar Service (4/5) – Rat Eggs
For the final solution, you must stack into the maitre’d / host, who is at his station near the entrance to The Commander’s Buffet.
Collection: Buffet Host Yves (11)
Without moving, use his “Summon Caviar Chef” ability, and when the chef appears, stack into him.
Collection: Caviar Chef Vladimir (9)
Go into the kitchen for one final time, and “Dump Caviar” to complete this challenge.
Challenge: Stop the Caviar Service (5/5) – Summons to Appear
Follow the objective maker up the next flight of stairs to the Towel Service Map Room where you learn that your objective is to muddle the maps and force Doktor Exakt to complain to the Captain. First, stack into the doll that is scrubbing the walls.
Collection: Mess Officer Morris (12)
Simply “Scrub” the towels.
Challenge: Muddle the Maps (1/4) – A Near Mess
At this point, you get a popup suggesting that you “Confront the Captain”, but we’ll do that later. For now, you should stack into the little red-headed boy who keeps tossing his cookies. You remember our little friend, Hans, don’t you? You’ll find that several dolls get used as part of the collection in more than one area.
Collection: Hans Allendorf (3)
Just “Toss Cookies” on the maps.
Challenge: Muddle the Maps (2/4) – Crumby Maps
Next, stack into a doll with a white glove and wearing one of those old-school political race hats, and then use him to “White Glove Slap” 10 dolls.
Hi-Jinks: Slap Happy – White Glove Slap dolls (10)
Now “White Glove Slap” the map assistant. For whatever reason, possibly due to it being a cutscene, this slap doesn't seem to count for the Hi-Jinks challenges, which is why I had you do the “Slap Happy” Hi-Jinks challenge first.
Challenge: Muddle the Maps (3/4) – Slapped Clean
For the final solution, stack into any child doll and take him to the Artist Makeover shop, and then speak to the artist there. He will “makeover” the child by placing a crayon on the child’s head.
Hi-Jinks: Masquerade Ball – Get dolls made over by the “Artistic Makeover” shop (1/5)
Note: you will return here for another challenge later, so you may want to wait to complete this Hi-Jinks challenge until then.
Now, simply “Color” on the maps in the Map Room and you will complete the final solution to this challenge.
Challenge: Muddle the Maps (4/4) – Color My World
Before we continue on, stack into the doll you have been harassing in the Map Room.
Collection: Map Assistant Gilbert (20)
Follow the objective maker towards the bow and through the small opening that leads to the Grand Adventurers as they try to get to the captain. Your task is to use each of the Grand Adventurer’s abilities, in turn, from smallest to largest, on each of the guards, and finally on the captain.
Collection: Grand Adventurer Set: Doktor Exakt (19) “Measure” the first guard
Collection: Grand Adventurer Set: Professor Ramses (18) “Mummify” the second guard
Hi-Jinks: All Wrapped Up – Use Professor Ramses to mummify dolls (5)
Note: This ability does not work on all dolls, but get as many as you can here.
Collection: Grand Adventurers Set: The Hunter Darby (17) “Fire Cork” at the third doll
Collection: Grand Adventurers Set: Madame Habitant (16) “Intimidate” the Captain
A cutscene ensues where the ship returns to dock. You meet up with Agatha and learn the fate of your sister, Abigail. -
HyruleBalverine posted a guide for Strike Breaker.
This is for completing the first part of the game. It's story related, so it can't be missed. However, if you follow this guide, you'll be on your way to earning the other achievements in the game, too.
Royal Train Station (Part One)
After the opening cinematic, you'll find yourself in a derelict section of the Royal Train Station. The train station is basically the main hub in the game and you'll come back to it often. Begin by walking forward and then press X to talk to Levi the Hobo. Once he moves out of the way, go forward and walk around the corner to the left. A cut scene will start and you'll be informed that you'll need to end the Coal Union strike in order to find your brother Albert.
During the cut scene you may notice a typo (manged instead of managed) and it won't be the only one you see during the game. Game developers spend a lot of time testing for bugs but they can't seem to use spell check. *facepalm*
Head forward and another cut scene will play showing you the layout of the first area. One it's done playing, progress further and you'll start a little tutorial of the game's mechanics. Head to the right and take note of the doll in the corner with the orange hair holding the 'Union Leader' sign. Notice how he he's a bit different than the others in that he has a sort of shimmering effect? That means he's a unique doll and will need to be stacked for the collection achievements. We can't stack him just yet, but soon enough!
Now walk into the next area and you'll be prompted to talk to the gatekeeper to get more information. He'll ask you to go find the Key Master so he can open the gate. Gatekeeper... Key Master... Where do I know that from? Who you gonna call? Ghostbusters! He'll now be standing directly behind you in the middle of the room. Believe it or not, he's the guy with the big key on his head. Walk behind him in order to stack into him.
Collection: Key Master Dawson (15)
Use his Unlock ability to unlock the gate by pressing A. Now proceed down the hallway to the left and then to the right. The next area is called the Main Concourse and I'll refer to it several times during the walkthrough. Continue on to the far end of the Main Concourse.
Now, on one side of you is the Royal Lounge. A short cutscene will play once you walk towards it. This is the game's first challenge called 'Empty the Lounge'. You'll notice that there are 3 solutions to this challenge noting by 0/3. After the cut scene you'll want to look to the right of the Royal Lounge; where you’ll see a male doll holding a wrench; stack into him!
Collection: Clerk-of-the-Works Jasper (6)
Now, use Jasper's “Maintain” ability on the fan that's close by. Walk through and talk to the host in the middle of the room. Congratulations, you've completed your first challenge!
Challenge: Empty the Lounge (1/3) – Fan-tastic
Near the door the Royal Lounge, you'll find a doll with long blond hair shaking her hips and holding a fan; stack into her.
Collection: The Widow Chastity (7)
To complete the next challenge, use the Widow Chastity's Seduce ability on the guard to lead him away from his post. Unstack from the Widow and walk behind the guard to stack into him.
Collection: Guard Perry (5)
Next go back to the Royal Lounge and use Guard Perry's Open ability on the door. Walk through the opening and talk to the host a second time.
Challenge: Empty the Lounge (2/3) – Unauthorized Entry
Head down towards the nearby restrooms. In this area you'll find a bald doll dressed white. If you have trouble finding him, he's the one farting on everyone else! Stack into him once you locate him.
Collection: Meriwether Malodor (1)
Now head back to the Royal Lounge and use Meriwether's “Flatulate” ability on the fan. Everyone will vacate the lounge due to the foul stench.
Challenge: Empty the Lounge (3/3) – The Fug of War
Since you've completed all of the solutions for this challenge you now can freely access the lounge. You'll notice that the 3 members of the train guild are outside of the Royal Lounge; for now you'll now want to stack into all 3 members of the train guild in order.
Collection: Ticketeer Frederick (9)
Collection: Conductor Orville (10)
Collection: Engineer Ulysses (11)
You'll now need to head down the steps back towards the trains, then go up the stairs to the right, and head into the Coal Room, where you’ll find a doll beating a drum; stack into him.
Collection: Drummer Perry (14)
Unstack from Drummer Perry and restack into the members of the train guild. If you take too long they'll walk back to the Royal Lounge, so you can find them there. Now head back to the trains and find the Union Leader we saw at the beginning. The two sides of the strike will reach a comical agreement and you'll have saved your brother Albert! -

HyruleBalverine posted a guide for Classic Speed Run.
I recommend that you do this using the Windows 8 version, as it's easier to move the cards. Your best times are shared across both platforms. If you do, make sure to switch back to your phone just before the last move in FreeCell.
KLONDIKE
Set your game options to Draw 1, this will make the game much easier, thus getting you a faster completion time. Play until all the face-down cards are face-up or on the foundation piles, and all the cards from the deck are placed on the board. Then hit the solve button in the bottom right corner (do not waste time manually moving the cards on to the foundation piles). My fastest time was 2:12.
SPIDER
Make sure the game options are set to 1 Suit. You will likely have to play a few games to get a good time; but try and create free columns as soon as possible. My best time was 6:57
FREECELL
Under Game Options, change the game to #10913. This FreeCell game is referenced in virtually every solution because it is the easiest / quickest one to complete. You can easily get this in under a minute and a half. Remember, however, that if using the Win 8 version, make sure to switch back to WP before making the final move). My best time was 0:23
-

HyruleBalverine posted a guide for Classic Speed Run.
If you've already completed this on a Windows Phone, playing one game should unlock the achievement.
This method requires you to use a Windows Phone because Microsoft seems to have patched the game to make the FreeCell cheat not work. That's Ok, because the game is shared across the two platforms, so your fastest time counts for both.
KLONDIKE
Set your game options to Draw 1, this will make the game much easier, thus getting you a faster completion time. Play until all the face-down cards are face-up or on the foundation piles, and all the cards from the deck are placed on the board. Then hit the solve button in the bottom right corner (do not waste time manually moving the cards on to the foundation piles). My fastest time was 2:12.
SPIDER
Make sure the game options are set to 1 Suit. You will likely have to play a few games to get a good time; but try and create free columns as soon as possible. My best time was 6:57
FREECELL
Under Game Options, change the game to #10913. This FreeCell game is referenced in virtually every solution because it is the easiest / quickest one to complete. You can easily get this in under a minute and a half. Remember, however, that this version requires you to use a Windows Phone, because Microsoft seems to have patched out the ability to pop the achievement if you change the game (basically it doesn't seem to work for people without switching to a WP before the last move). My best time was 0:23
-

HyruleBalverine posted a guide for Daddy’s Little Girl.
Updated 05-13-2016 03:08 AM
I found this solution on PlayStationTrophies and found it to be quite helpful. I've made some minor adjustments to convert it to Xbox.
Story related, cannot be missed.
You will fight Cheshire in the third stage of the first mission, "Greece". She can be quite difficult if you are playing your first playthrough on Hard.
Her main attacks are shooting projectiles at you, so I advise to constantly jump around by pressing A and take cover behind the 2 pillars in the middle of the arena. It is difficult to inflict damage by using X and Y in close quarters as she is pretty strong and can easily drain your health in a few hits. I advise that you stay back and attack her with long range attacks with any of the characters. Personally I mainly used Artemis and utilized her crossbow attack by pressing RT + X. The main way to inflict damage to Cheshire is when she teleports away and crouches to prepare her rocket launcher. When this happens quickly run up to him and spam either Y or RT + Y . This will knock her over and take away a large chunk of her health. You can also stay back and spam RT + X to fire repeated projectiles with Artemis/Aqualad and it seems to set off the rocket/RPG. You will need to do this around 5-6 times before you defeat her.
General Tips-
• Use the two pillars to block her projectile attacks, as they can cause a lot of damage.
• Cheshire will only attack the character you are currently controlling. Use this to your advantage by running around the arena, giving your fellow comrades time to attack or by constantly change characters.
• Watch the health of your three players. If one goes down, quickly get to them by jumping or dashing and heal them by pressing B.
Original solution: http://www.playstationtrophies.org/g...ttle-Girl.html -

HyruleBalverine posted a guide for Moon Copter.
This one is fairly simple.
From the Rules Sheet:
On the right half of the table you can see a watch/clock face in front of a ramp/orbit that looks sort of like sewer grating or bars. Hit the ball up this ramp until the Whirlyball on the blue/green sign above the ramp is lit up. There are four items on this sign, so it will take four shots with one ball. The lights seem to go back a place if you lose a ball.Light the Whirlybird on the right ramp, then load it with high explosive bombs by locking balls into the Moon Copter. Three balls and the Whirlybird takes off for low-altitude urban warfare, ready to bomb thugs back to the stone age in Whirlybird Multiball.
Once you have Whirlybird lit, continue shooting the ramp to lock three balls. After you've locked the first ball, you can lose a ball and still lock more without having to light the sign again.
When you lock three balls Whirlybird Multiball starts and the achievement unlocks.
This is how I unlocked it on the 360 version.
*video made by YouTube member ElementJ09. It shows all 3 Moon Knight table achievements.
-

HyruleBalverine posted a guide for Moon Copter.
This one is fairly simple.
From the Rules Sheet:
On the right half of the table you can see a watch/clock face in front of a ramp/orbit that looks sort of like sewer grating or bars. Hit the ball up this ramp until the Whirlyball on the blue/green sign above the ramp is lit up. There are four items on this sign, so it will take four shots with one ball. The lights seem to go back a place if you lose a ball.Light the Whirlybird on the right ramp, then load it with high explosive bombs by locking balls into the Moon Copter. Three balls and the Whirlybird takes off for low-altitude urban warfare, ready to bomb thugs back to the stone age in Whirlybird Multiball.
Once you have Whirlybird lit, continue shooting the ramp to lock three balls. After you've locked the first ball, you can lose a ball and still lock more without having to light the sign again.
When you lock three balls Whirlybird Multiball starts and the achievement unlocks.
*video made by YouTube member ElementJ09. It shows all 3 Moon Knight table achievements.
-

HyruleBalverine posted a guide for Flame on!.
The game tells you this: "Spell out TORCH letters via Torch ramp shots to ignite the ball. If it's collected, Four Sign ramp shots must be completed with flaming balls to complete the sign and start this multiball mode."
Here's how you do it.
To activate the TORCH letters, you must get the ball all the way up the small ramp that is slightly hidden under the right hand side ramp. If the ball does not go all the way up the ramps, or you get credit for a "trick shot" which comes down on the left side, you will not get credit for the Torch ramp.
You will know you're getting close, because when you get TORC, Johnny will shout "Flame on!" (not to be confused with the "Flame on! Skillshot!")
Once all five shots have been made, Johnny will fly over to the sign ramp (the ramp leading to the 4 symbol with Doom on top). You must hit the ball up this ramp four times, igniting the lines of the 4 symbol. After some time, the ball will lose its flame. When this happens, hit it up the Torch ramp again.
I've found what usually works for me to get the ball into position for the Torch ramp is this:
From the left paddle, hit the ball through the INVISIBLE ramp/orbit all the way around.
From the right paddle, hit the ball into the hole just left of the sign ramp (where you'll start missions if you've gone into the Baxter Building) then hit it with the top right paddle when it pops out.
Try and get it to follow the line of flame drawn/painted on the board.
This is how I unlocked it on the 360 version. -
HyruleBalverine posted a guide for Flame on!.
The game tells you this: "Spell out TORCH letters via Torch ramp shots to ignite the ball. If it's collected, Four Sign ramp shots must be completed with flaming balls to complete the sign and start this multiball mode."
Here's how you do it.
To activate the TORCH letters, you must get the ball all the way up the small ramp that is slightly hidden under the right hand side ramp. If the ball does not go all the way up the ramps, or you get credit for a "trick shot" which comes down on the left side, you will not get credit for the Torch ramp.
You will know you're getting close, because when you get TORC, Johnny will shout "Flame on!" (not to be confused with the "Flame on! Skillshot!")
Once all five shots have been made, Johnny will fly over to the sign ramp (the ramp leading to the 4 symbol with Doom on top). You must hit the ball up this ramp four times, igniting the lines of the 4 symbol. After some time, the ball will lose its flame. When this happens, hit it up the Torch ramp again.
I've found what usually works for me to get the ball into position for the Torch ramp is this:
From the left paddle, hit the ball through the INVISIBLE ramp/orbit all the way around.
From the right paddle, hit the ball into the hole just left of the sign ramp (where you'll start missions if you've gone into the Baxter Building) then hit it with the top right paddle when it pops out.
Try and get it to follow the line of flame drawn/painted on the board.
Badges (401)
Friends (569)
Showcase
| Achievements | ||||
|
|
|
|
|
|
|
|
|
|
|
|
|
|
|
|
|
|
|
|
|
|
|
|
| Games | ||||
|
|
|
|||
Achievement Streaks
| Start Date | Days | ||
|---|---|---|---|
| 10-14-2021 | 144 | 815 | 28.9K |
| 12-06-2014 | 134 | 985 | 20.2K |
| 05-14-2014 | 36 | 526 | 11K |
| 09-14-2020 | 34 | 252 | 8.9K |
| 06-22-2013 | 31 | 180 | 2.1K |
Achievements by Rarity
Super Rare |
0% - 4.99% | 1,730 |
Very Rare |
5% - 14.99% | 1,028 |
Rare |
15% - 29.99% | 1,375 |
Uncommon |
30% - 49.99% | 2,763 |
Common |
50% - 100% | 7,663 |